Add one student
You need to manage students (or report sheets).
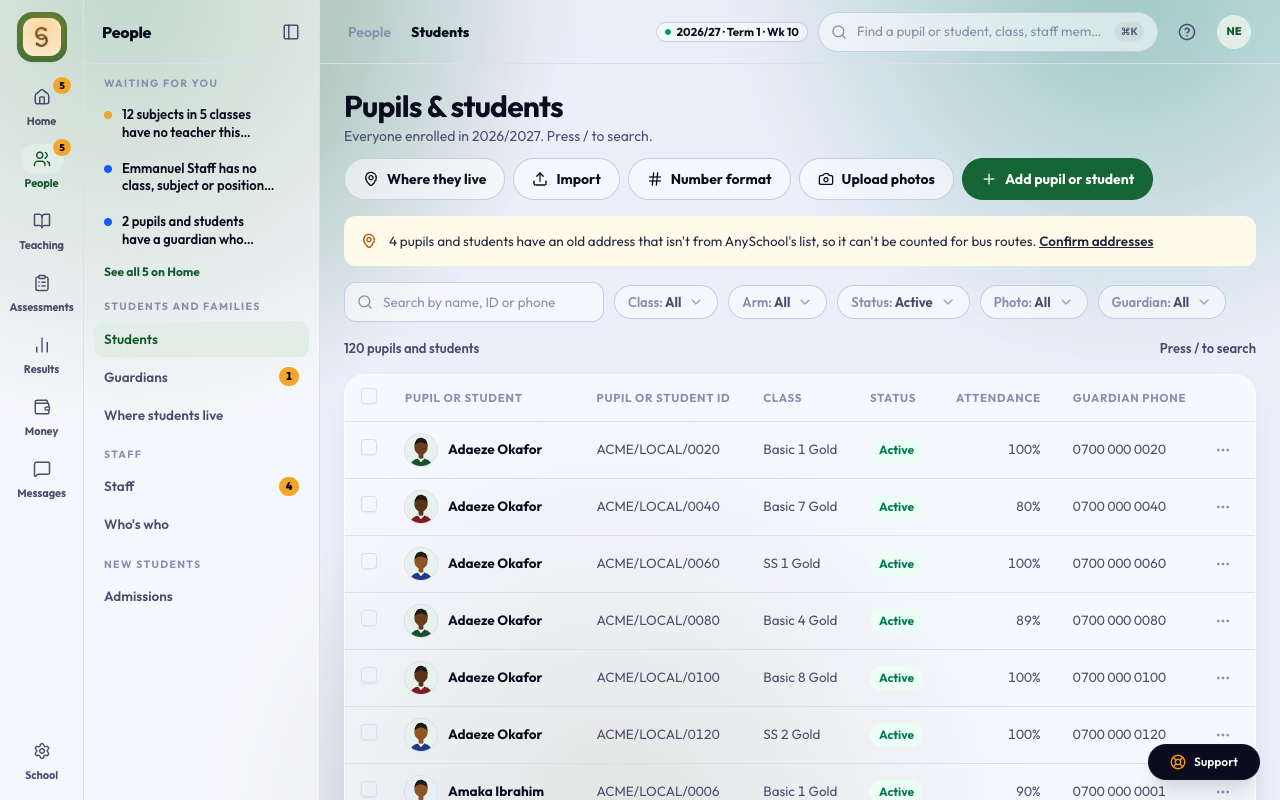
- Choose Students in the People space. Your school may use its own word, such as Pupils.
- Press Add student.
- Fill in First name and Surname. Other names, Gender and Student ID are optional.
- Choose a Class and arm, or leave it as No class yet. If you manage only one section, you must choose a class.
- Press Add student.
If the class list is greyed out, the current session isn’t set yet. See Set the session and term.
Import a whole list from a spreadsheet
Use this to bring the school across from Excel or your old system. You need to manage the whole school’s students.
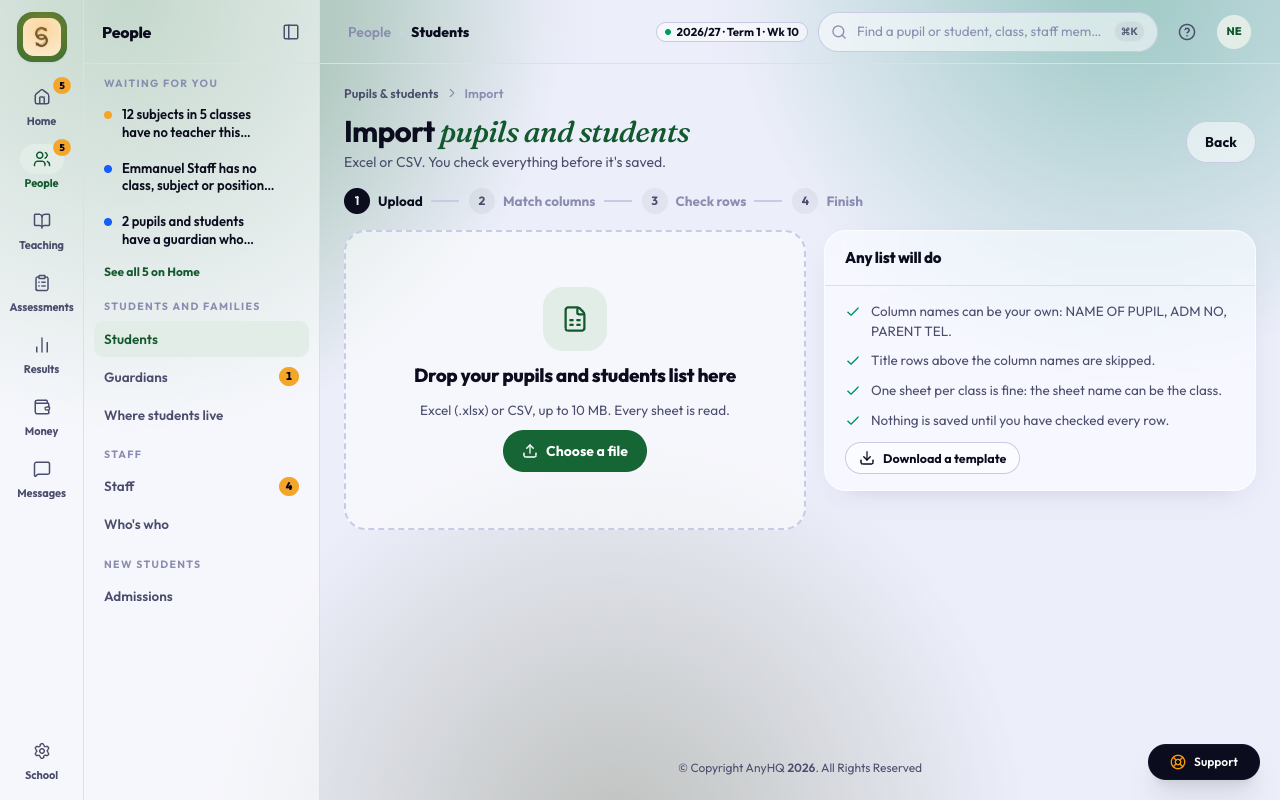
- On Students, press Import.
- Upload: drop the file, or press Choose a file. Excel (.xlsx) or CSV, up to 10 MB and 3,000 rows. Every sheet is read, so one sheet per class is fine.
- Match columns: your own column names are fine (for example NAME OF PUPIL, ADM NO, PARENT TEL). Check what each column Goes into: names, Student ID, gender, date of birth, class and arm, guardians’ names, phones and emails, and more. Set columns you don’t need to Ignore this column.
- You need a name column, or Surname and First name.
- Each field can come from only one column.
- When your school has Where Students Live on, columns for where they live come in too: State they live in, LGA they live in (or Area Council), Area, Street and house number, Nearest bus stop, Digital postcode and School bus (Yes or No). A plain State or LGA column means the state and LGA of origin, unless the list also has an Area or Bus stop column: then it’s where they live, marked Please check.
- Press Continue: check rows.
- Check rows: look at Needs a look first. Use Edit to fix a row, or Skip to leave it out. Under Classes in your file, match each class written in the file to one of your arms. A state or LGA that isn’t on AnySchool’s list is noted on its row, and that row’s address is left blank; an area that isn’t listed is saved and waits for AnySchool to add it. An import never changes an address someone has already saved from the list.
- Press Import.
Nothing is saved until you press Import. Students who seem to be enrolled already only get what their record is missing.
If some rows fail, press Download them. Fix them in the download and upload that file again.
Not sure how to lay the list out? Press Download a template on the first step and fill it in.
Bring earlier classes across
If AnySchool has it on for your school, the import also takes each student’s classes in earlier sessions, so their profile shows every year since they were admitted.
- Add a column per past session, headed with the session: Class 2023/2024, Class 2024/2025. Each cell is the class that year, such as JSS 1 Gold.
- Or put them in one column (Earlier classes), as 2023/2024: JSS 1 Gold; 2024/2025: JSS 2 Gold.
- Under Classes in your file, earlier classes are matched to your arms like the rest. Choose Leave that year out for a class you no longer have.
- Only sessions before the current one count. The current session’s class comes from the Class column.
- Date admitted sets the day they joined in their first session; every later session starts in September.
Importing the same file again adds nothing twice.
Import past results
Bring each term’s results from before your school used AnySchool. Import the students first: results find them by their Student ID.
- On the import page, press Import past results.
- Choose the Session and Term the sheet is for.
- Drop the sheet. It needs a row per student per subject, with Student ID, Subject, and a Total (out of 100) or a Grade. Position is optional. Press Download a template for the layout.
- Look at what we found, then press Import.
Imported results show on each student’s profile under Earlier results, tagged Imported. Nobody can change them there, and positions stay as your school wrote them. To correct a term, import the fixed sheet again (it updates the same results), or remove the term under Imported so far and import it afresh.
A student’s record
Open a student to see Overview, Guardians and Results.
- Edit in Details changes their details. Everything except the names can be left empty.
- Print ID card prints their card.
- Results lists their approved report sheets, and any Earlier results your school imported. If your school has Performance Analysis for teachers turned on, it also shows what their answers say, free: the class teacher sees every subject, and a subject teacher sees only the subjects they teach. Families get theirs with the report sheet. Under Topics, each subject’s topics are marked Strong, On track or To improve, with how many questions the student got right in each (for example 4 of 5 right). They come from the online test questions tagged with a topic, and a topic needs at least 3 questions to show.
- Results over time, when your school has it on, sits at the top of Results: a small line per subject of their term totals across terms and sessions, the latest total with how much it went up or down, and their Strongest subjects and those that Need attention over the last three terms. The class teacher of their arm sees every term; others see the terms whose report sheets they can open. A subject with one term so far says Shows after 2 terms.
- Home address, when your school has Where Students Live on, has its own card under Details. Press Add address (or Edit) and choose the State, the LGA (an Area Council in the FCT) and the Area from AnySchool’s list, then fill in the Street and house number, the Nearest bus stop or landmark and, if the family knows it, the 11-character Digital postcode (such as FC 02 A09 DB 09; press Find your postcode to look it up on NIPOST’s site). Say whether the family would like the school bus. If the area isn’t listed, type it and choose Use “…”: it’s saved with Waiting for AnySchool to add this area until we add it. The address typed before stays on the card as Old address.
- Medical, when your school has it on, sits under Details. Allergies and Conditions show to everyone who may see the student, so a class teacher knows. Staff who manage the student also see the blood group, genotype, medicine, special needs, family doctor, immunisations and whether the parents allow emergency treatment, and press Edit (or Fill in) to type in a paper form. Parents fill it in and confirm it once a session in the parent app, and an applicant’s answer to the medical question starts it when they’re enrolled. There’s no export, and each time staff open a medical form it’s recorded.
- Pick-up list, when your school has it on, sits under Guardians. It shows who may collect the student: their guardians always, and up to six other adults, such as a driver, a nanny or a relative, each with a phone number and, if added, a photo. Press + Add to add someone, or a row’s menu to Edit them or Take off the list. Parents add theirs in the parent app, marked From a parent. Press Print card for an A4 pick-up card for the gate: the student’s photo and class, then everyone allowed with their photo and phone. Print it again when the list changes.
- Looks like… shows under an old address that names a place on the list, such as Plot 12, Kubwa Expressway: press Use this to save that area, with the old address kept as the street, or Change to adjust it first. Nothing is saved until you press one.
Confirm old addresses
When your school has Where Students Live on and students still have addresses typed before AnySchool’s list, Students says how many, with a Confirm addresses link.
- Each student shows their old address and the area it Looks like, if it names one.
- Press Use to save it, Change to choose the area yourself, or Skip to leave it for later. Use all saves every suggestion on the list at once.
- Addresses that name no place say No area found: press Choose to pick the state, LGA and area.
The old address is kept as the street, so a house number isn’t lost. You see the students you can change.
- On the list, a row’s menu has Move class, Mark as left (with the day and reason) and Re-admit.
History on a student’s page
If your school has switched Change history on, top management and the bursar see a History tab on each student’s page. It lists, one line each, who added the student, edited their record, moved them to another class or linked or unlinked a guardian, and when. It covers this term and the one before, and doesn’t show what the values were.